Azure ML Pipelines and MLOps with GitHub Actions – Part 3

As this is Part 3, you might want to review Part 1 and Part 2 for context if you haven’t yet.

In Part 3, I will finally focus on the GitHub action.

All of the code for this can be found on my GitHub.

How to run the training process from GitHub Action

To put the "Ops" in "MLOps" the pipeline execution should be automated whenever possible. The scenario being used in this repository is when code is checked in, the training pipeline is automatically kicked off from a GitHub Action and if the newly trained model has a higher accuracy than the previous model, then it will be registered in the model repository.

To review, iris_supervised_model.py does the training and register_model.py obviously registers the model. The pipeline that runs these two steps is built and executed from train_pipeline.py. So it is this train_pipeline.py (also referred to in this repository documentation as the driver script) that needs to be executed from a GitHub action.

Creating the GitHub Action

Actions allow for automation of processes. They are YAML scripts.

I won’t pretend to be an expert on YAML or the action schema, but i pulled a sample and made some modifications. Action scripts should be placed in .github/workflows directory of the repo.

name: iristrain
on: [push]
jobs:
  run:
    runs-on: [ubuntu-latest]
    container: docker://dvcorg/cml-py3:latest
    steps:
      - uses: actions/checkout@v2
      - name: train_pipeline
        env:
          repo_token: ${{ secrets.GITHUB_TOKEN }}
          AZUREML_CLIENTID: ${{secrets.AZUREML_CLIENTID}}
          AZUREML_TENANTID: ${{secrets.AZUREML_TENANTID}}
          AZUREML_SECRET: ${{secrets.AZUREML_SECRET}}
          AZUREML_SUBSCRIPTION: ${{secrets.AZUREML_SUBSCRIPTION}}
          AZUREML_RESOURCE_GROUP: ${{secrets.AZUREML_RESOURCE_GROUP}}
          AZUREML_WORKSPACE: ${{secrets.AZUREML_WORKSPACE}}
        run: |
          # Your ML workflow goes here
          pip install -r requirements.txt
          python azureml/train_pipeline.py

The above code shows that on [push] so when any code is pushed to the repository, the jobs: will be performed. Unique to this example is the environment variables env: that are all populated from GitHub secrets. They are passed into the train_pipeline.py script which is invoked with the last line of the yaml file above. Any libraries required to run the python script need to be installed first on the container therefore the pip install -r requirements.txt is there. The current requirements.txt has more than what is needed to run the script, specifically azureml-sdk is the entry required for this scenario.

Service Principal Authentication to Azure ML

Unlike building a pipeline and running it from a Jupyter notebook interactively, to use automation the credentials to login to Azure ML have to be stored. Using an Azure Active Directory user principal is the right way to do this.

Creating a service principal in Azure will likely require elevated permissions in Azure. Work with your Azure administrator to enable this.

In this notebook there is a section for Service Principal Authentication that walks through the setup. Once a service principal is created, it can be used from the train_pipeline.py script.

from azureml.core import Workspace
from azureml.core.authentication import ServicePrincipalAuthentication

svc_pr_password = os.environ.get("AZUREML_SECRET")
svc_pr = ServicePrincipalAuthentication(
    tenant_id=os.environ['AZUREML_TENANTID'],
    service_principal_id=os.environ['AZUREML_CLIENTID'],
    service_principal_password=svc_pr_password)

ws = Workspace(
    subscription_id=os.environ['AZUREML_SUBSCRIPTION'],
    resource_group=os.environ['AZUREML_RESOURCE_GROUP'],
    workspace_name=os.environ['AZUREML_WORKSPACE'],
    auth=svc_pr
    )

Note the heavy use of environment variables. This is to ensure that credentials and other private variables are not stored clear text in this repo for the world to see. These are being passed in from the action yaml shown above.

More comprehensive information on Azure ML authentication can be found here

GitHub Secrets

The above section highlights the environment variables being used. These variables are initiated from the GitHub repositories action secrets.

GitHub Secrets

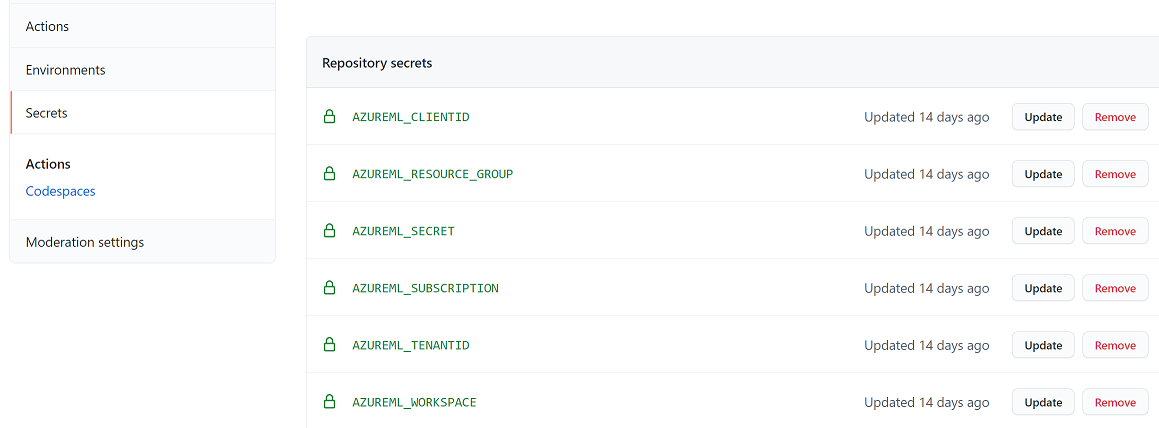
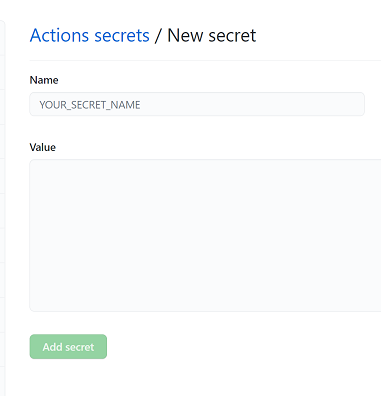
These secrets are created in the repository from the "Settings" tab. In the "Secrets" section, click the "new repository secret" button to add a secret.

GitHub New Secret

It should be obvious that the secret names need to match the secrets given in the yaml action script: ${{secrets.AZUREML_CLIENTID}}.

Invoking the GitHub Action

Any change to the source code based on this simple action definition will invoke the train_pipeline.py which defines and then submits the iris_train_pipeline with the snip of code below.

iris_train_pipeline = Pipeline(workspace=ws, steps=[trainingScript,registerModelStep])
print ("Pipeline is built")

exp = Experiment(ws,experiment_name)
exp.set_tags({'automl':'no','working':'no'})

pipeline_run1 = exp.submit(iris_train_pipeline)
print("Pipeline is submitted for execution")

pipeline_run1.wait_for_completion()

This will happen from master or a branch. To see the action in action, in iris_supervised_model.py change the n_splits from 5 to 3.

code change example

Do a commit and push. Note: I have been using VSCode. The Python editor and GitHub integration is legit!

On the Actions tab of the repo, a new action is now visible with a "yellow" icon to indicate "in progress" actions list

Click on the run to see the details in progress action

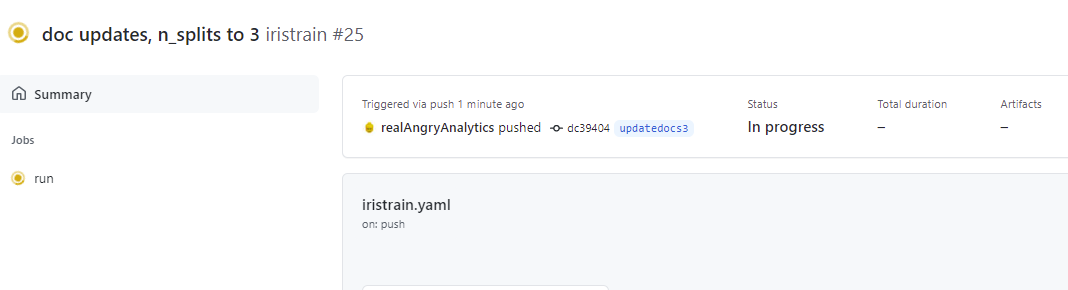
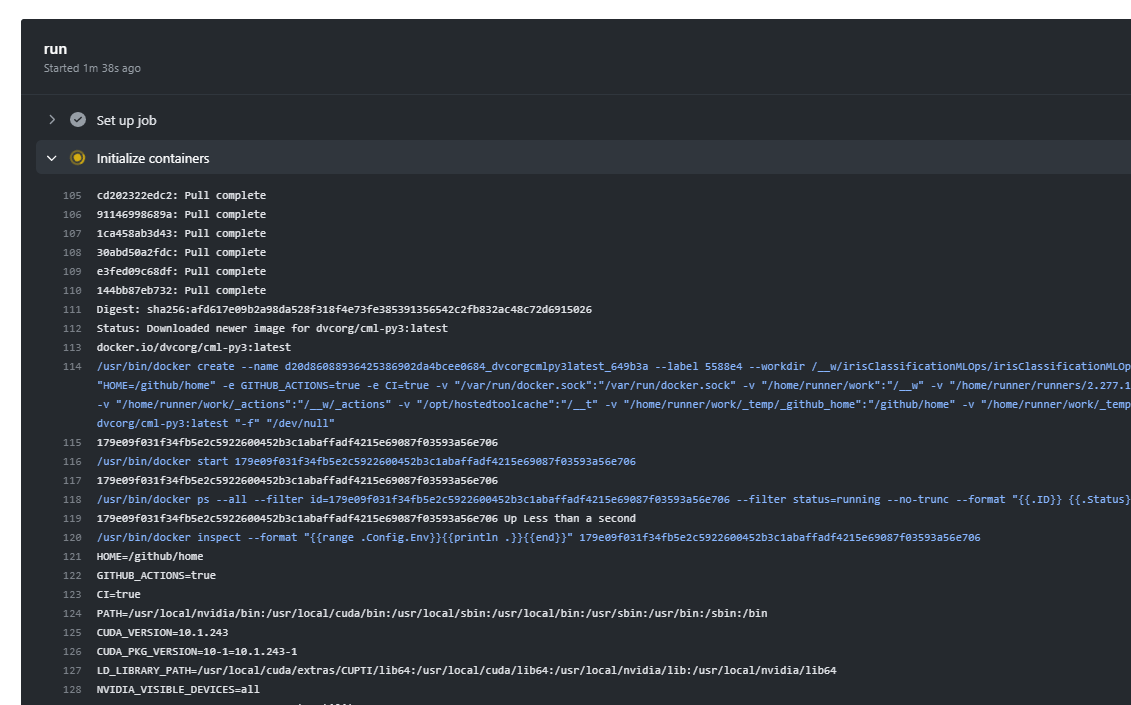
In the details section click on the run itself and the logs can be reviewed in real time. First GitHub is acquiring a container image to install the necessary python configuration to run the train_pipeline.py script. action detail 1

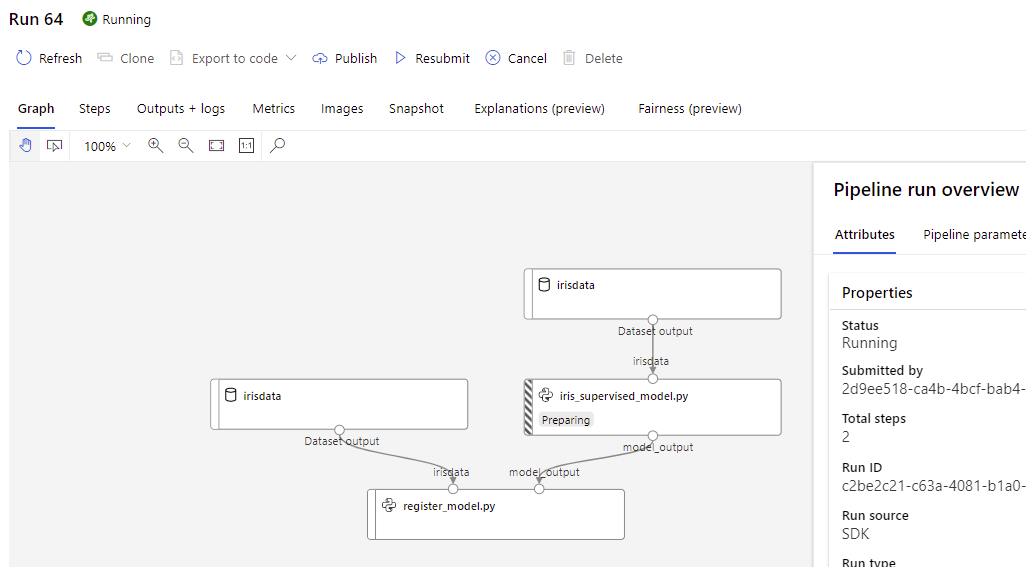
Once the image is acquired, it kicks off the Azure ML Pipeline which can be reviewed in Azure ML Studio action pipeline

pipeline_run1.wait_for_completion() is an important line in train_pipeline.py that keeps the script from completing until the Azure ML pipeline completes. Without this line the action will finish while the pipeline is still running. This may be desired depending on the scenario.

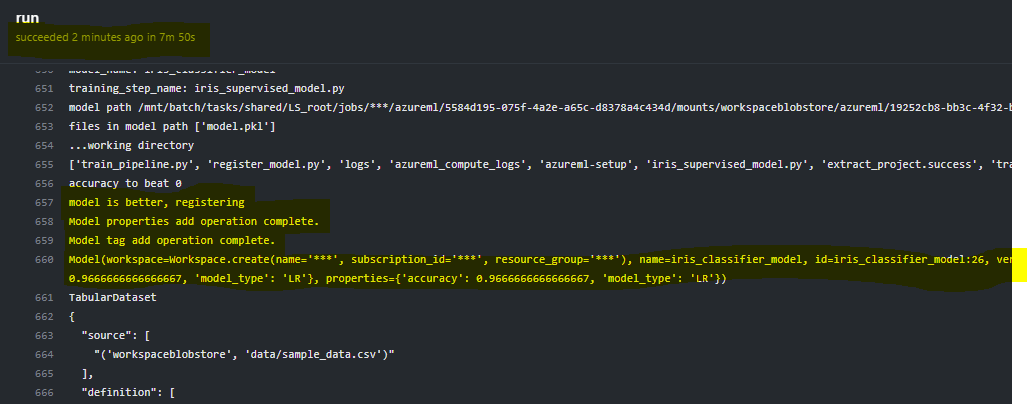
The logged pipeline outputs will be displayed in the run output. action complete logs

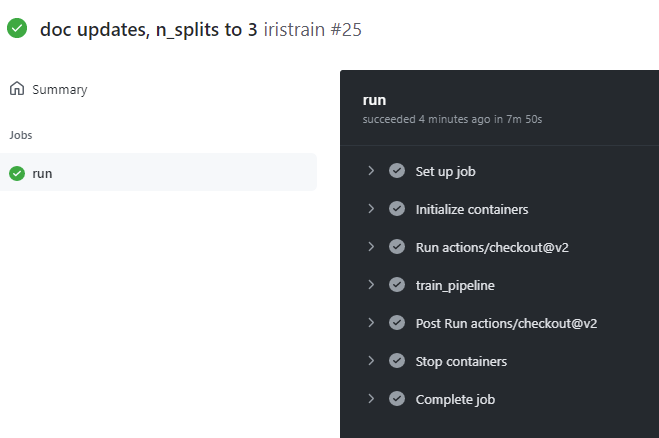
When it is complete, the status will show green. acton complete

Conclusion

That is it. Now your training process is fully automated based on code check in. And yes, YAML is still the most awful definition language but you have to just shut up and deal with it 🙂

Azure ML Pipelines and MLOps with GitHub Actions – Part 1

I have been working on customer projects with Azure ML pretty regularly over the last two years. Some common challenges:

  • Microsoft highly promotes the AKS deployment for real time inference, yet most of the time customers are still looking for an effective way to do batch scoring.
  • When customers leverage Azure ML pipelines for batch processes they struggle with the concept of pushing datasets and files between steps. This erodes the true power of splitting an ML process into steps.
  • MLOps is hard and overwhelming.

This is not a “start from the beginning” blog post. This is going to assume that you have familiarity with Azure ML If you are not, the sample notebooks are seriously EXCELLENT! However, they seem to get you 90% there but miss out on implementation details that are key for success.

The scenario I am using below and can be found on my GitHub. It is an Azure Pipeline that trains several iris classification models. It picks the best one and logs it. In the next pipeline step, if that model is better than the previous training run, it will register the model. This training pipeline can be put on a schedule or it can be triggered from a code check in. In this case, from a GitHub action.

In a later blog post, i will discuss in more detail the model registration process (some production tips there) and the GitHub action, but I will start with properly passing datasets and files between steps.

Passing datasets and files between steps

Other than a few blogs I have found on the internet, instructions on how to properly pass files or datasets between steps are hard to find.

pipeline_image.PNG

In the above image you can see that irisdata is passed into iris_supervised_model.py and then model_output is the output. When you define the pipeline in the driver script, the input data is a DataReference object and any data passed between steps is a PipelineData object.

from azureml.core.datastore import Datastore
from azureml.data.data_reference import DataReference
ds = ws.get_default_datastore()
print("Default Blobstore's name: {}".format(ds.name))

dataset_ref = DataReference(
    datastore=ds,
    data_reference_name='irisdata',
    path_on_datastore="data/sample_data.csv")
print("DataReference object created")
from azureml.pipeline.core import Pipeline, PipelineData
model_output = PipelineData("model_output",datastore=ds)
print("PipelineData object created for models")

In the PythonScriptStep, utilize the input and output parameters.

from azureml.pipeline.steps import PythonScriptStep
trainingScript = PythonScriptStep(
    script_name="iris_supervised_model.py", 
    inputs=[dataset_ref],
    outputs=[model_output],
    compute_target=aml_compute, 
    source_directory="./azureml",
    runconfig=run_config
)

Simply pass the “model_output” from outputs as input to the next step (the register_model.py that will be a focus of the next blog post) and so on.

Using these references in the script

When you submit a pipeline job to run, a container is created and all the files in the source_directory specified in the PythonScriptStep are imported into the container. The input and outputs effectively become mount points for blob storage to that container. In the iris_supervised_model.py script step this mount point is accessible via an environment variable that looks like the below.

os.environ['AZUREML_DATAREFERENCE_irisdata']

This is also the same environment variable format used for the output location (the PipelineData object) which appears to be a randomly created storage location given to you from AzureML.

mounted_output_path = os.environ['AZUREML_DATAREFERENCE_model_output']

Looking at the mounted_output_path variable above gives a location like: mnt/batch/tasks/shared/LS_root/jobs/amlworkspacesjh/azureml/715a1dca-fafc-4899-ae78-ffffffffffff/mounts/workspaceblobstore/azureml/71ab64d9-bc4c-4b74-a5a5-ffffffffffff/model_output


You should be able to treat these environment variables as a file location just like a local path. So for the irisdata which was a csv file in the data reference you can read it like normal.

df = pd.read_csv(os.environ['AZUREML_DATAREFERENCE_irisdata'], names=column_headers)

For the model_output we pickle the model file and save it to the mounted_output_path.

pkl_filename = "model.pkl"
mounted_output_path = os.environ['AZUREML_DATAREFERENCE_model_output']
with open(os.path.join(mounted_output_path, pkl_filename), 'wb') as file:
    pickle.dump(best_model[1], file)

Now look into register_model.py, we utilize the PipelineData object (model_output) as our input and reference the same environment variable as in iris_supervised_model.py

mounted_output_path = os.environ['AZUREML_DATAREFERENCE_model_output']
print("model path",model_output)
print("files in model path",os.listdir(path=model_output))

In the file list, model.pkl is there right where it was created in the training script.

Conclusion

The ability to pass data between pipeline steps is pretty easy, but the documentation on using the magic “AZUREML_DATAREFERENCE_***” environment variables is lacking in most of the sample notebooks I have found. Just remember that these are mount points and can be interacted with just like local files basically.

Up next, Part 2

The “where have I been?” footnote

It has been 21 months since my last blog post. My role at Microsoft has led me to focus much more on cloud data services for only a couple of customers. I loved to blog about Power BI but I just haven’t been in that space for awhile as my day to day responsibilities were handed over to the much more capable @notaboutthecell. I have been working a lot on real time stream processing (with Databricks / Cosmos DB / Azure Functions) and ML engineering activities with Azure ML. Blog posts have been difficult as so much of my work is implementation oriented and it is hard to recreate everything in a publicly sharable way.

Or maybe i have just been lazy 🙂

Anyway, I am sure that the blog posts in my future are probably going to be more narrow in application and probably won’t be “marathon reads” that explain everything in detail but hopefully enough to connect the dots for the people who need it.