The new Matrix visual in Power BI is impressive and with a few tricks you can make great interactive scorecards and heat maps. At first glance, you may assume this to be easy, but you will see in the below content you have to make some deliberate decisions with formatting and also create several measures to get the job done.


I have the finalized PBIX file on my GitHub repository so use that for reference as we walk through building these visuals.
I am using the AdventureWorksDW dataset for this. I have imported the FactResellerSales table and selected the related tables. The main tables used will be FactResellerSales, DimEmployee, DimSalesTerritory, FactSalesQuota
I have created 5 base measures to be used for our scorecard. Note that I have manufactured the Customer Complaints value by using RAND. The required measures are below:
//add this as a calculated column in FactResellerSales table
Customer Complaint Indicator = IF(ROUND(RANDBETWEEN(0,1000),0)=999,1,0)

//add these measures to the FactResellerSales table
Sum of Sales Amount = sum(FactResellerSales[SalesAmount])

Total Orders = DISTINCTCOUNT(FactResellerSales[SalesOrderNumber])

Discount Percentage = IFERROR(sum(FactResellerSales[DiscountAmount]) / sum(FactResellerSales[SalesAmount]),blank())

Sum of Customer Complaints = sum(FactResellerSales[Customer Complaint Indicator])

Quota Variance = ([Sum of Sales Amount] - sum(FactSalesQuota[SalesAmountQuota]) ) / sum(FactSalesQuota[SalesAmountQuota])
Also, one more change to make things more readable. In this data set in DimEmployee do a rename on the EmergencyContactName to Full Name. I noticed that this was the concatenated value of First Name and Last Name… or you could create a calculated column if you wish.
To create a scorecard as I have shown above, we need to use the “Selected Measure” trick where we will create a Measure table and use a DAX expression to populate the appropriate measure value depending on which value is selected in the table.
You can use the “Enter Data” button in the ribbon to simply enter the 5 values (and optionally an order) as shown below

Now with the Metrics table and the measures you have added above, you can create the below measure to switch between them based on a slicer or filter that has been applied
Selected Measure = IF(
    ISFILTERED(Metrics[Value]),
    SWITCH(
        FIRSTNONBLANK(Metrics[Value],1=1),
        "Sales Amount",sum(FactResellerSales[SalesAmount]),
        "Total Orders",[Total Orders],
        "Discount Percentage",[Discount Percentage],
        "Customer Complaints",sum(FactResellerSales[Customer Complaint Indicator]),
        "Quota Variance",[Quota Variance]),
    BLANK())
This snippet shows a SWITCH statement used against the FIRSTNONBLANK value only if the Metrics table ISFILTERED
You can try this out by creating a simple bar chart visual using the Selected Measure as the value and the DimEmployee[Full Name] (that we created earlier) as the X Axis. Also add the Metrics[Value] as a slicer

This simple trick allows us to get a row for each measure on our scorecard later.
Lots of Measures
The next part is tedious. Each of our 5 measures above actually requires 5 additional measures to get the attributes found in the scorecard. This means 30 total measures to show 5 rows in our scorecard.

The opportunity here however is if you are not a DAX expert, this may be a good primer for you to understand how DAX really makes almost anything possible in PowerBI. I will show the formulas for “Sales Amount” and a few nuances for other metrics after that. For all the details, refer to my GitHub repository with the PBIX file.
For our scorecard, we want to be able to show a percentile and a quartile value. This makes it easy at a glance to see how an individual (or sales region) is doing in respect to their peers. To get either of these values, we must first calculate the RANK of the sales person.
We will use RANKX to calculate the RANK of the sales person for [Sum of Sales Amount]
Sales Amount Rank =
    RANKX(
        ALL(DimEmployee),
        [Sum of Sales Amount])
Note the use of the ALL function over DimEmployees. Because FILTER Context is applied in a table or matrix visual, when a row is shown for employee “Amy Alberts”, because of relationships in the data model, the only rows from the FactResellerSales table that are being evaluated for a measure are the ones for Amy Alberts’ employeeKey. We need to use ALL to ensure that filter context is cleared when evaluating the RANKX expression. See the below table as an illustration.

There is one more problem with our DAX however… DimEmployee has over 200 employees and not all of them are in Sales. The above DAX will calculate a rank for ALL employees instead of JUST the sales employees. One method to reduce this is to simply set this column to BLANK() if the [Sum of Sales Amount] measure is blank. The final DAX used is below. (I used a variable for readability but not necessary)
Sales Amount Rank =
var rnk = RANKX(
        ALL(DimEmployee),
        [Sum of Sales Amount])
RETURN IF(ISBLANK([Sum of Sales Amount]),BLANK(),rnk)
NOTE: simply using sum(FactResellerSales[SalesAmount]) will not work here, this is why we created a measure for it
With a Rank value, now we can calculate the “percentile” the sales person is in. This is effectively “normalizing” the ranks.
Sales Amount Percentile =
var a = countrows(
            FILTER(ALL(DimEmployee),DimEmployee[DepartmentName]="Sales"))
var b = [Sales Amount Rank]
return IF(b=0,BLANK(),IFERROR(ROUND((a-b)/a,2),blank()))
To determine the denominator, we are using a FILTER to only retrieve the employees that are in the “Sales” department.
Now with the percentile, we can determine the quartile the sales person is in.
Sales Amount Quartile =
IF(ISBLANK([Sales Amount Percentile]),BLANK(),
    IF([Sales Amount Percentile]>=.75,1,
        IF(FactResellerSales[Sales Amount Percentile]>=.5,2,
            IF([Sales Amount Percentile]>=.25,3,
                4))))
I have used the ISBLANK() function to ensure I do not get any unwanted values showing up in Quartile 4. (Note: I had an Excel savvy client tell me I could use MOD() for this but I couldn’t get it to work, so this may be more verbose than it has to be)
Lastly, lets get the average Sales Amount for the company as a comparison for the score card.
Sales Amount Avg = CALCULATE(
              AVERAGEX(DimEmployee,[Sum of Sales Amount]),
              FILTER(ALL(DimEmployee),DimEmployee[DepartmentName]="Sales"))
CALCULATE applies the second argument’s FILTERed table to the first argument’s expression. AVERAGEX will get the average value of [Sum of Sales Amount] by the DimEmployee record
Now apply the same logic to the other 4 metrics we want to put on our scorecard. A few things to note are explained below.
When using RANK, some of the metrics such as Discount Percentage (as we don’t want to give big discounts to make sales) and Customer Complaints need to be ranked in ascending order instead of the default of descending order. So in those instances, we need to add an additional parameter to the RANKX function.
Customer Complaint Rank =
var rnk = RANKX(
              FILTER(ALL(DimEmployee),
                  NOT(ISBLANK([Sum of Customer Complaints]))),
              [Sum of Customer Complaints],,ASC)
RETURN IF(ISBLANK([Sum of Sales Amount]),BLANK(),rnk)
We have added “ASC” as the 4th argument to RANKX for “Ascending” order. Notice the missing 3rd argument. This is to tell the rank function if you want DENSE ranking. We want the default which means if 3 values are tied for the 10th ranking, the next rank will show 13 instead of 11.
Also, in the above measure, we have added a FILTER to the ALL(DimEmployee). See the below screenshot to see the RANK without this filter:
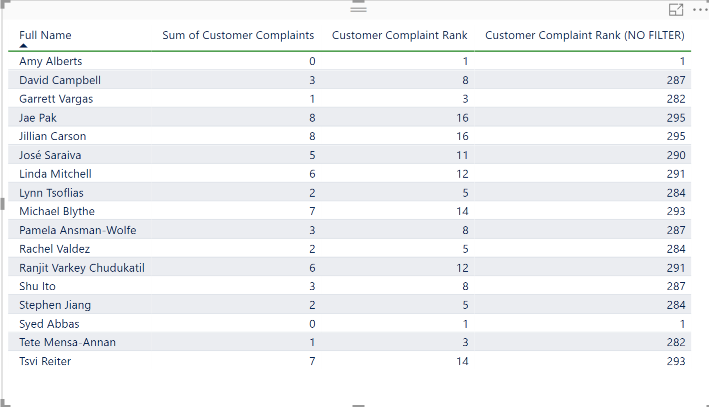
When the FILTER expression appears, we are further reducing the table in the first argument. Here, we are checking for [Sum of Customer Complaints], if it ISBLANK(), then applying a NOT to that. So, if [Sum of Customer Complaints] is not blank, we want to include those rows in the ranking. This is necessary to add when doing an ASCENDING rank as employees in the employee table that have no sales records are still getting ranked. This is true also when in DESCENDING order but it doesn’t matter because those rankings are below the sales people and because we have applied the ISBLANK([Sum of Sales Amount]) after the rank has occurred, they are filtered out anyway.
Just as was done with the Selected Measure before, each of these additional measures that may be displayed such as “Quartile” and “Percentile” need to have the ISFILTERED condition applied to the Metrics table:
Selected Percentile = IF(
    ISFILTERED(Metrics[Value]),
        SWITCH(
            FIRSTNONBLANK(Metrics[Value],1=1),
            "Sales Amount",[Sales Amount Percentile],
            "Total Orders",[Total Orders Percentile],
            "Discount Percentage",[Discount Percentage Percentile],
            "Customer Complaints",[Customer Complaints Percentile],
            "Quota Variance",[Quota Variance Percentile],
            BLANK()))
Repeat this with Quartile and Avg measures.
Formatting the Scorecard
Create a new matrix visual

Now select the Metrics[Value] as Rows and your Selected Measure measures as values.

On the screenshot above you will notice that I added an additional measure Selected Measure Target . This follows the same pattern as shown above with the SWITCH statement and uses the sum of FactSalesQuota[SalesAmountQuota] as well as the 3 static values for Customer Complaints Target, Discount Percentage Target, and Quota Variance Target. I left Total Orders as BLANK(). The final measures are shown below.
Customer Complaints Target = 0

Discount Percent Target = .01

Quota Variance Target = 0

Selected Measure Target = IF(
    ISFILTERED(Metrics[Value]),
        SWITCH(
            FIRSTNONBLANK(Metrics[Value],1=1),
            "Sales Amount",sum(FactSalesQuota[SalesAmountQuota]),
            "Total Orders",BLANK(),
            "Discount Percentage",[Discount Percent Target],
            "Customer Complaints",[Customer Complaints Target],
            "Quota Variance",[Quota Variance Target],
            BLANK()))
Apply a matrix style from the formatting menu in the visuals pane. I chose Bold header.

I also increase the “Text Size” property in the Column Headers, Row Headers, and Values all to 11.

With the July 2017 release of Power BI Desktop, you can now simply right click any of the values in the selected fields and rename them. This allows us to rename our row and column headers.

Now we have this

Right click on the Percentile in the selected fields pane and select conditional formatting -> data bars
In the below dialog, notice that I have changed the Minimum/Maximum to Number values 0 and 1. This is to keep the data bars from being “relative” to what is shown and will show the full span from 0-100%. Also have changed the Positive bar color to a gray so that the bar is not distracting, but rather accents the percentile.

Now right click the Quartile and select conditional formatting -> color scales

See the selections in the above screen shot.
Format blank values – I select “Don’t Format” as when a value is blank, don’t give the impression that it is actually good or bad
Minimum and Maximum – I change these values from Lowest and Highest value to a Number. This is because you want every representation of quartile 1,2,3,4 to be the exact same color. If you leave this as default, sometimes 2 will be completely red and sometimes it will be completely green
Diverging – This gives us a center color that helps make the 2nd quartile look light green and 3rd quartile be orange.
The hex values I use for these colors are 107C10, FFFE00, A80000 respectively
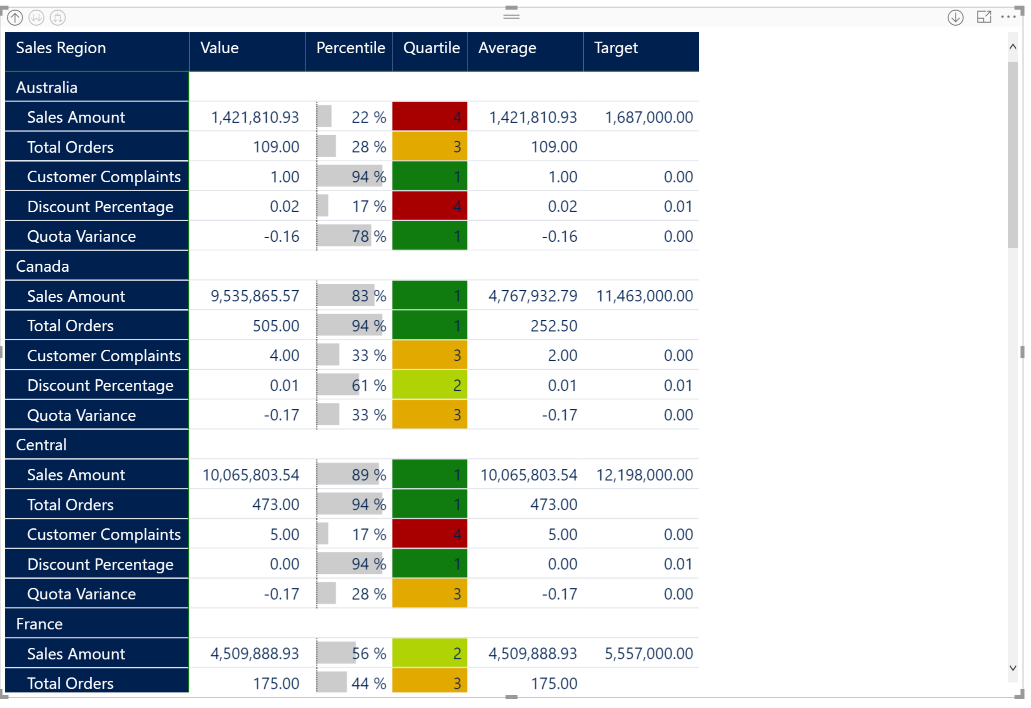
Now the scorecard is complete. Add a slicer for Employee[Full Name] and you can see how each of your sales people are doing

Insight taken from the above screenshot that “Linda Mitchell” is one of our best sales people but it may come at the expense of customer complaints and giving deeper discounts than others.
Creating the Heatmap Visual
Now we can take the skills acquired from the scorecard to create a heatmap.
Simply use a matrix visual again and set the rows to DimEmployee[Full Name] and select each individual measure you want to display as a value. Try to put all the quartiles together so there is a good heatmap effect. Include additional measures that may be valuable to sort by. Remember, the matrix visual has automatic sorting by column so this may help with analysis. I have selected the below values.

With re-applying the Quartile conditional formatting logic from above, the heatmap should looks something like this.

If you have a bunch of additional employees showing, add the DimEmployee[DepartmentName] as a visual or page level filter and that will reduce your rows.
Using a Region Hierarchy
IF you are still here (most of you have already thought TL;DR by now)… we can real quick add a calculated column in the DimEmployee table for “Sales Region” so that we can create a heatmap that roles up to the sales region.
Sales Region = LOOKUPVALUE(DimSalesTerritory[SalesTerritoryRegion],
                   DimSalesTerritory[SalesTerritoryKey],
                   DimEmployee[SalesTerritoryKey])
Simply add the DimEmployee[Sales Region] to your Rows above your DimEmployee[Full Name]. Now you have a heatmap that can rollup to the sales region level. See below.
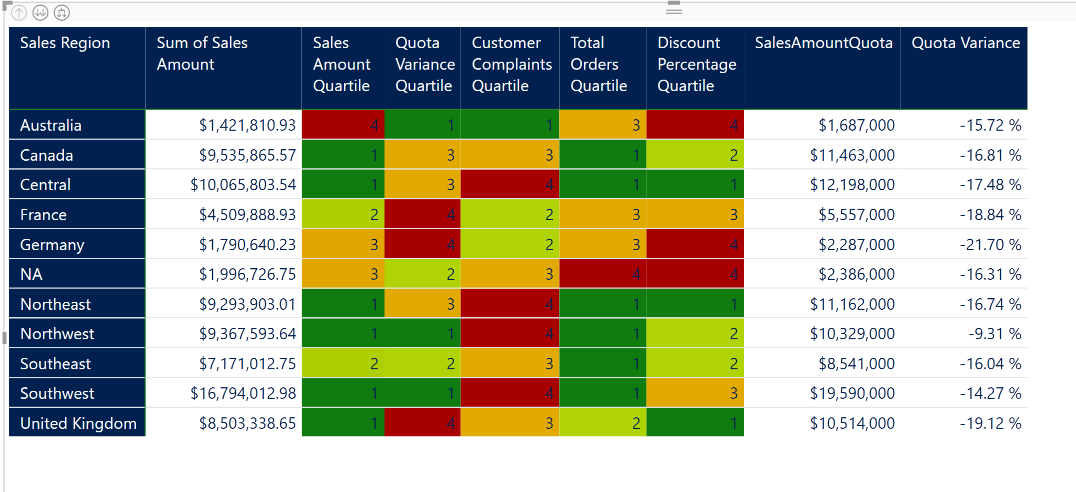

On the scorecard you now can see comparisons of your regions as well.
Conclusion
There are many variations of scorecards and heatmaps. I have found the above use of the new Matrix visual to be very good.

One comment
Comments are closed.